


Taking photos of — and with — your child is a great way to save and share your outdoor fun. Here are some tried-and-true tips for photographers of all ages:
1. Fit the SHAPE
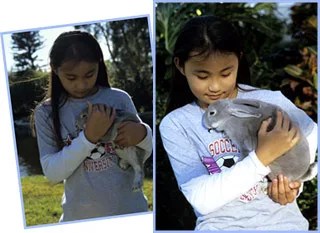
Think of your camera’s viewfinder as a picture frame. Try to match the frame to the shape of your subject. If you have a vertical subject, don’t hold the camera in the “normal” way (below left). Turn your camera sideways to fit the shape of your subject (below right).

2. Get the LIGHT RIGHT
If you shoot toward the sun, your subject may come out too dark (below left). Shoot with the sun behind you or to the side and the subject will come out just right (below right).
If you shoot in bright, midday sun, your photo may have lots of glare and dark shadows (below left). Wait for a cloud to come along, or shoot early or late in the day. That will “soften” the glare and shadows for a more pleasing photo (below right).

3. Fill the FRAME
Small things can “disappear” if you shoot from too far away (below left). “Supersize” your subject by using your camera’s zoom or by moving closer (below right).

4. Cut the CLUTTER
Check all parts of your frame before you shoot. Watch for stuff that doesn’t belong and takes attention away from your subject (below left). Move your subject (or yourself) or zoom in to get a simpler, uncluttered background (below right).

5. Go LOW
Got a subject at ground level? Aiming down (lower left) might be OK, but it’s usually better to get down on your knees or even your belly and go eye to eye (lower right).

6. Catch the MOMENT
Think you have a good shot lined up? Go ahead and shoot (lower left). But then wait a moment. With patience, you may turn a good shot into a great one (lower right). Try to catch that magical moment.

*Photographs by J.H. Pete Carmichael
Tips reprinted with permission from the National Wildlife Federation’s Green Hour website: www.greenhour.org.